

This guide will provide the steps of conducting a final test.
Final Test
- Below is the structure of the content:
- Step by Step for final test
- Check ecomm settings
- Woocommerce test
- User Sign Up
- User purchase flow
- Order Notification
- Shipping Option display correctly?
- Payment option display correctly?
- Test all the forms *Please always put your email / PM inside before test – if dont form are dummy please delete it.
- Point Rewards
- Abandont Cart
- Yith Add to Quote ( Optional )
- Wishlist (Optional )
* If those project involved membership and etc …. Please look into ecom checklist / check inside the main project group before do a full test.
Steps for final test
This template can be used as a guideline to do final test. Not necessary to follow but this will provide you a general idea on what we should test on each section.
Updated Ecomm checklist: (Paste the link of the latest ecomm checklist)
Final Testing screenshots
1. User Sign Up
-Account created email: (Paste the screenshot link of the email template)
2. User purchase flow
-Order On-Hold: (Paste the screenshot link of the email template)
-Order Processing: (Paste the screenshot link of the email template)
-Order completed: (Paste the screenshot link of the email template)
-Invoice: (Paste the screenshot link of the invoice) – Make sure Logo , Company Info is in on Header , Copyright on the Footer
3. Order notification (admin)
-New Order: (Paste the screenshot link of the email template)
-Cancelled Order: (Paste the screenshot link of the email template)
-Failed Order: (Paste the screenshot link of the email template)
4. Shipping Option display correctly?
(Paste the screenshot link of the shipping option)
5. Payment option display correctly?
Payment method: (Paste the screenshot link of the payment method)
6. Test all the forms
-Contact form name: (Paste the screenshot link of the email template)
7. Points & Rewards
(Paste the screenshot link of the points & rewards calculation)
8. Abandont Cart
Check Ecomm Settings
First thing before we do a final test on the project, we need to make sure the ecomm setting are done. This is crucial because we will test all those setting in the final test. After you check all the ecomm setting and everything is done, attach the link of the latest ecomm checklist in the template. That’s it! Now proceed to the next phase.
Woocommerce Test
1. User Sign Up
To perform this test, open a new browser and go to the website that you need to test. After that, create a new account with the email address that you are using. Do not use dummy email address otherwise you will not able to view the email template. Once the registration is completed, you will receive a email about your registration is successful. Take a screenshot of that email template and turn them into a link. You can use any of these service if you want: ImgBB, Lightshot
Next, just copy the link of the screenshot and paste it in the final test template.
Example of the screenshot: https://ibb.co/XJhxwDd
2. User Purchase Flow
To begin with this test, log in to the account you just created in the first test and make a dummy purchase. After that, you should be able to receive an email about your purchase. Depending on the payment method, the email that you will receive will also be different. For example, if you use PayNow as payment method, you will receive an email about your order has been received but on hold for payment. If you use Stripe or any credit card payment, you will receive an email about you order is processing. So try to use all payment method to do dummy purchase to test it out.
You can manually change the order status atWoocommerce > Order > Look for your order > Change order status
For this test, we need the screenshots of these three email template and one screenshot of the invoice (normally will be attached with order completed email):
Example
1. Order On-Hold: https://ibb.co/cyvgg7y
2. Order Processing: https://ibb.co/RPSG3KF
3. Order Completed: https://ibb.co/3y9WGzC
4. Invoice: https://ibb.co/ZcGH93g
For more details about the order status, please review this blog:Order Status
After you have the screenshot links of the email templates, just paste them in the final test template.
3. Order Notification (Admin)
Before we begin the order notification test, we need to set the following setting first. Go toWoocommerce > Settings > Emails and change the recipient email address of New order, Cancelled order, and Failed order. Change the email address to project manager’s and your email address. Example: mpd.huiling@gmail.com, mpdintern5@gmail.com . After that, we should be able to receive order notification if there is an order.
Same as the previous test, we need to make some dummy purchase. You can manually change the order status at Woocommerce > Order > Look for your order > Change order status. Once the purchase is completed, go to your email inbox and take screenshots for these email template:
Example
1. New Order: https://ibb.co/whrLVs4
2. Cancelled Order: https://ibb.co/rcXWCd7
3. Failed Order: https://ibb.co/DV38W3L
For more details about the order status, please review this blog:Order Status
After you have the screenshot links of the email templates, just paste them in the final test template.
4. Shipping Option Display Correctly?
The objective of this test is to see whether the shipping option can be displayed correctly or not. To test this, add some product in your cart and go checkout or just go to your cart. Normally there are three type of shipping option we can check but not all project will use these three shipping option. Those shipping option are: Flat rate, Free shipping & Local Pickup
You can modify the quantity of the products in the cart and check if those shipping option will be triggered. For example, let’s say the client wants a flat rate of $5 for orders that below $50 and free shipping for orders that equal or above $50. So to test this setting, you can add a product that is under $50 to test if the flat rate will be charged. After that, make your cart amount equal or above $50 to see the free shipping will be triggered or not. Once those shipping method can be triggered by following the rule we set, just take a screenshots of the shipping method to prove the setting is correct.
Example:
4. Shipping option display correctly?
Below $800, charge $80: https://ibb.co/YXqyw0x
$800 and above, free shipping: https://ibb.co/ftJqBn3
Local pickup: https://ibb.co/z25TGCQ
**Please do noted that some project might use plugin as their shipping option so you need to take screenshot of the shipping option that are provided by the plugin*
5. Payment Option Display Correctly?
This test is very simple. All you need to do is take screenshots on the available payment option. You need to ensure all
payment option will display during checkout
Example:
– Direct Transfer / PayNow: https://ibb.co/zhNz3qq
– Stripe: https://ibb.co/bXWzYYD (Currently in test mode)
6. Test All The Forms
Before we begin this test, we need to set the following setting first. Go toContact > Contact Forms > Select in-use contact form > Go to Mail tab and change the recipient email address to project manager’s and your email address. Example: mpd.huiling@gmail.com, mpdintern5@gmail.com . After that, we should be able to receive contact forms in our email inbox.
After the setting above is done, go to the website and look for those contact forms. Simply type something in the form and make sure the email address is your in-use email address. Then you should be able to receive the email of the contact form in your email inbox. Same thing, just take a screenshot of the email and convert it into a link. After that, paste it in your final test template.
If you are not able to receive the email, most likely is because of the setting of the contact form or SMTP. So just try to configure the setting and try again. For more details about the SMTP, please read this blog: Information for setup SMTP
Example:
6. Test all forms
Contact Us: https://ibb.co/c6DtfJJ
7. Points & Rewards
For this test, you need to test the calculation of the points correct or not. To test this, add some products in the cart and go to cart or checkout page. At the top of the page, you will be able to see something similar like: If you proceed to checkout, you will earn 10000 points! OR Use 1000 points for a $100.00 discount on this order! Apply Discount. These are the things that you need to take screenshot
Example:
7. Point Rewards
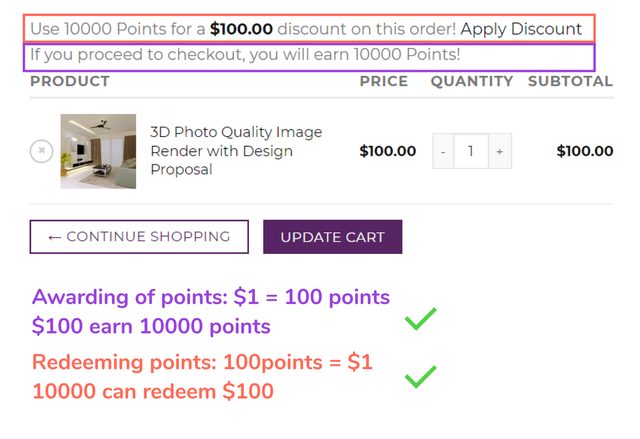
**It is not necessary to include the conversion rate in the screenshot, just try to prove the setting for points & rewards is correct and that should be fine*
And…that’s it! You have done the final test for the project. Before you update the status of the task, please be sure that the recipient email address for order notification and contact formhas been changed to client’s email address.
If you want to see the full example of a complete final test template, you can check this task: Final Test Sample